
Painting on Aluminum Composite substrate (DIBOND)
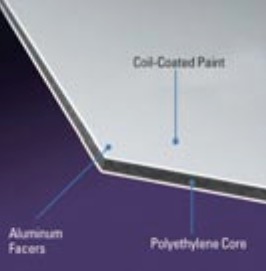
Dibond is an Aluminum Composite Material, composed of two sheets of .012″ aluminum with a solid polyethylene core. Note that Dibond is a brand name and you may find it in some retailers with a different brand name such as: Epanel, Alupanel, or Omega Panel. Dibond is a lightweight material with acceptable dimensional stability and is quite puncture proof. Due to its unique qualities, it has been used in a variety of applications such as; wall-mounted signs, billboards, panel screen printing etc…
Also its durability makes it quite ideal as a painting substrate for artists and can be considered the best substitute compared to stretched linen or canvas.
This article describes the process of cutting, surface preparation for ground and float hanging system of Dibond panels, which will be discussed more in details later on.
Where to buy Dibond panels:
Laird Plastics Company has distributers in most states and they carry un-cut panels or custom cut based on your needs. There are other retailers and sign shops that may carry these composite panels. You can buy them online or order pre-cut from Amazon.
Here are the links:
-Laird Plastics Company: https://www.lairdplastics.com
-Amazon pre-cut Dibond: https://goo.gl/XUKHVz
This video is a fast forward demonstration of preparation for painting on composite panels (Dibond). The process included are cutting, sanding and surface preparation for painting ground.
Cutting
Dibond cutting can be accomplished best by saw cutting or routing. Knife cutting fabrication method is not recommended for composite panels, although this method is more convenient in an artist’s studio. The excessive tension created by the knife cutting process (folding the cutting joint) may lead to bowing of the substrate. If a cut is only made on one side of panel, folding the cutting joint with a back and forth motion, (in order to break the cut) will cause a slight “roll-down” of the aluminum sheet on the folding impact side. In this “roll-down” area, the polyethylene core is compressed and can lead to increased stress between the core and the aluminum sheets (the beam structure of panel).
This imbalanced tensile and compressive stress on composite components, can cause the substrate to bow.
Therefore, if the panel must be cut with a knife, it is imperative to cut on both sides of panel, to minimize tension within composite components. Also, don’t fold the cutting joint more than needed and don’t fold the joint more than a 45 degree angle.
Here is the cutting process with blade snap-off knife:
– Start by measuring and marking the cutting line on both sides of panels.
– Use bar clamps and attach the safety ruler to the panel, make sure ruler aligns with cutting line.
– Cut on both sides of panel, 8 to 10 passes on each side, light pressure at first and then gradually increase pressure on each pass.

Safety Awareness Tip:
THE AUTHOR SHALL NOT BE HELD LIABLE FOR ANY OF YOUR ACTIONS PERFORMED.
KEEP YOUR EYES ON THE OBJECT WHILE CUTTING, NEVER LOOK AWAY OR BECOME DISTRACTED.
USE SAFETY RULER WITH A VERTICAL PROTECTIVE GUARD THAT ENSURES SAFE & ACCURATE CUTTING.
WEAR CUT RESISTANT GLOVES WHEN USING SNAP-BLADE KNIFE.
DO NOT APPLY TOO MUCH PRESSURE ON THE BLADE. IT CAN SNAP OFF THE HANDLE.
DO NOT TRY TO CUT MORE THAN THE KNIFE CAN HANDLE.
ALWAYS USE A SHARP BLADE. DULL BLADES ARE NOT SAFE!
– You can make your own safety ruler by clamping a 1” x 48” Angle Aluminum to a straight edge. 
– After cutting on both sides of panel deep enough through the aluminum sheets and polyethylene core, the cutting joint should separate easily by folding the panel back and forth lightly (don’t fold the cutting joint more than a couple of times and don’t fold the joint more than a 45 degree angle).
-File, sand and smooth out all the rough corners.
SURFACE PREPARATION
-Remove the protective film from panel.
-Use sanding block or power sander with 150-200 grit pads. Lightly scuff-sand entire panel surface, make sure not to sand through the Aluminum Coating Surface.

-To avoid deamination and preserve archival quality, surface should be cleaned and free of any contaminates (i.e. oils, sanding dust particles, etc.) prior to commencing. Clean and degrease the panel with 70% Isopropyl alcohol, wipe to remove all dust particles from the surface.
Bonding Primer & Ground
Most composite panels are pre-coated on one side by the manufacturer and can be painted on directly, but to achieve archival quality painting, the adhesion between layers needs to be increased by using bonding primer, which is designed for hard and non-porous surfaces. Spray one coat of binding primer, then apply two coats of gesso and sand between each coat of gesso. Subsequent layers of gesso will produce a smooth painting surface.
For this application we chose Rust-Oleum Spray Paint Auto Primer:
-Shake the spray can thoroughly before spraying, then spray an even coat of primer on the entire panel surface.
-Allow 4 hours for primer to dry completely (don’t sand in between), then apply first coat of gesso.
-Shake the gesso container before use. For this application we use a 6″ roller. In order to achieve an even coat and avoid roller marks for larger panels, you may need to dilute the gesso with 5% to 20% of water, or spray water in between coats with a spray bottle. Don’t press too hard when smoothing out the gesso.
 -Wait for 3 hours, then lightly scuff-sand with 200-grit. Next, apply second coat of gesso.
-Applying multiple coats of gesso over the Dibond panel, will create more absorbency on the surface. Depending on painting method, it may require a surface with less absorbency. In this case, use a different type of painting ground or use an oil based imprimatur layer as a sealer over the gesso.
DIY Float hanging system for frameless Dibond Painting Panels (DIBOND)
This invisible hanging system allows a painting to be the focal point without any distractions from a hanging apparatus.
This article describes the design and construction of a float hanging system that allows you to exhibit a frameless painting using Dibond panels. This float hanging system affixes to the back of panel (medium and large formats) and it is not visible from the front view, meaning a painting panel will have the appearance of floating approximately 1/4 inch from the wall. It also can be mounted on the panel prior to surface preparation, or even after completion of painting.
Although there are a variety of float hanging systems and aluminum rails available in the industrial printing market, most of these hanging systems are not convenient to obtain nor suitable for installation on the aluminum surfaces of composite panels. Thus, the purpose of this article is to presents a simple DIY artist’s approach to the concept.
On a side note, even though designing and building a hanging system seems very simple, all composite panels are prone to counter-balancing problems (explained at the end of this article), which means an increased stress between the core and the aluminum cover sheets can cause the substrate to bow. On the other hand, these thin 0.012″ aluminum sheets that are composite on both side of a polyethylene core panel, can be deformed and delaminated under continuous structural stress, especially when hanging a large size painting panel on a single point hanger. Thus, the best solution is to design a simple weight distribution module that can be attached as a hanger on the back of the Dibond panel. But before we start, let’s review some facts about weight and weight distribution on composite surfaces.
Consider these basic facts about painting on a Dibond panel: let’s assume that we have a 48” x 60”=20 sq’panel with 3 mm thickness & weight of 0.79 lb. /ft2 multiply by 20 sqf =15.8 lb. (weight of panel itself) and we use two coats of gesso roughly 16 oz. (or 8 oz. after liquid vaporization occurs), and this panel generously was painted with alla prima or the old master flemish technique with multiple layers of glazing and varnished ≈ 32 oz total weight. So as you see the heavy weight of mineral pigments and oil mediums adds up, with a 20 square feet oil painting. The rough weight estimate would be 18 lbs. and this dead load will continuously transfers to the center of gravity of the panel, which in this case is the hanger on the back side of panel.
This load transition should occur without causing the substrate to bow, or having any negative effects on archival quality of art work on the other side of panel.
So we need a weight distribution module that can safely transfers 18 lb. of dead load to the 0.012″ thin aluminum composite sheet on the back side of the panel.
-This video presents two different methods to build these hanger modules. The first method is fairly simple and it can be used to hang either a large or small panel. Because of thermal expansion and the coefficient of expansion for unlike materials, we chose to build this hanger module using Dibond itself as a building material. And this will be done by cutting and attaching two small Dibond plates together with a compatible adhesive. In this method one plate is slightly larger than the other, which will create a flange or rim on the edge of the fastener on the wall. In addition, there is a notch in the lower middle section to position the fastener in the center of panel.
This is how it looks (as shown in picture below).

– In this method, the plate sizes of the hanger module are 3” x 6” and 3”-1/4 x 6”. This is intended for large and heavy painting panels with sizing greater than 48” x 60”, and weight of 10 to 25 lbs.
In this case using epoxy adhesive (60 minute) will produce a shear strength of 1406 ± 372 psi. on the thin aluminum surface. This will create a weight distribution module that safely transfers and distributes the total panel weight over a larger aluminum surface. Eventually this load will transfer over the CG (Center of Gravity) and to the fastener on the wall.
Here is the process:
-Cut two Dibond pieces: Size 3-1/4″ x 6″ and 3″ x 6″, then cut a notch in the middle of 3-1/4″ x 6″ piece.(as shown in video)

–Mark the upper center and draw a perpendicular line on the back of panel.
-Position one of the plates exactly in the center with 6” space below the upper edge and mark (as shown in picture below).
 -For permanent installation, cut and remove the protective film from inside the square mark on panel and plates. For temporary installation, DO NOT remove the protective film from panel (by incorporating RTV Silicone, these hanger modules can be removed without damaging the substrate).
-For better adhesion, light sand and clean all plates and panels with 70% Isopropyl alcohol (if using RTV Silicone, clean all plates and panels only with 70% Isopropyl alcohol).
-Mix the 60 min Epoxy 50/50 by volume, be sure to follow instruction on the bottles. Mix resin and hardener together thoroughly and apply it first on the panel and then on smaller plate 3” x 6” (the plate without a notch). Next, position it precisely in the center of panel (as shown in video).
-Apply epoxy on the top of smaller plate.
-Then apply the remaining epoxy on the larger plate (3”-1/4 x 6”) and affix it on the top of smaller plate.
Note: by overhanging the larger plate on top of smaller plate, a 1/4’ flange will be created and the notch should be facing down and precisely in the center.
-Remove excess epoxy, clean out everything with Isopropyl alcohol and make sure plates are aligned.
Make sure working surface under the panel is completely flat and stable, then place some weight with adequate pressure on the top of plates and allow at least 24 hours for epoxy to cure, then check the panel for balance. This panel now is ready for ground and painting.
The same method can be applied for smaller panels by cutting small size hanger plates, such as; 2” x 4” and 2”-1/4 x 4” which are adequate for mid-size (48” x 36” W/ 8 lbs. or less) panels. The Epoxy adhesive can be replaced with RTV Silicone.
The second method is mostly appropriate for mid-size panels but smaller than 48” x 36” (w/8 lb. or less). This process has more fabrications than the previous method. Self-leveling property is the advantage of this design.
In this method, incorporate a sawtooth frame hanger with a small 2” x 4” plate as a weight distribution module. This allows to build a saw tooth hanger with self-Leveling property that attaches easily to any composite panel. Alternatively for this design, we are using RTV Silicone with high chemical tensile strength. Bear in mind, that the RTV is removable after it’s cured, and can be useful for temporary display settings.
Note: The saw tooth hangers are designed for regular wooden frames and canvases, and can’t be installed on Dibond panels or thin aluminum surfaces.
Here is the process:
-Cut small Dibond plate: Size 2″ x 4″
-Mark the center of plate (as shown in picture below).
-Position the center of saw tooth hanger exactly in the center of mark. And mark only the saw tooth inside legs, NOT the base.

-Cut the line mark and make sure the sawtooth mid-section can recess into the plate.
-In order to completely recess the sawtooth base into the back side of plate surface, remove two small squares from cutting side by Dremel cutting wheel (on the back side of plate).

-Reduce the Dremel cutting wheel speed setting to minimum.
Make sure NOT to cut through the solid Polyethylene Core. Cut and remove only from aluminum surfaces. So the base of the sawtooth legs are flash with plate surface on the back side (as shown in picture below).
– Make sure the sawtooth can recess into the plate perfectly, the hanger module is now ready to install on any composite panel.
DREMEL CUTTING WHEEL HAZARDS:
THE AUTHOR SHALL NOT BE HELD LIABLE FOR ANY OF YOUR ACTIONS PERFORMED.
USE SAFETY GLASSES OR A FACE SHIELD WHEN USING CUTTING WHEEL.
USE LOCAL EXHAUST WHEN MACHINING, GRINDING OR SANDING TO MINIMIZE EXPOSURE AND MAINTAIN AIR BORN DUST.
WEAR GLOVES DURING PROLONGED CONTACT TO AVOID SKIN IRRITATION FROM DUST.
BEFORE MAKING THE CUT OR GRIND, VISUALIZE THE CUTTING PATH OF THE CUTTING WHEEL.
KEEP YOUR EYES ON THE OBJECT WHILE CUTTING, NEVER LOOK AWAY OR BECOME DISTRACTED.
WHEN CUTTING AN OBJECT, PLACE IT ON A STABLE SURFACE TO PREVENT SHIFTING.
WHEN POSSIBLE, HOLD THE OBJECT WITH ANOTHER DEVICE OTHER THAN YOUR HAND WHEN CUTTING OR GRINDING.
-Mark the center and draw a perpendicular line on the back of panel.

-Clean plate, saw tooth and panels with 70% Isopropyl alcohol.
-Apply RTV silicone on all parts. Then place the hanger module exactly in the center line with 1” space below the upper edge.
-Remove excess silicone, clean out everything and make sure plates are aligned.
-Place some weight on the hanger module and allow at least 24 hours for RTV Silicone to cure. Next, inspect it for balance.
-Here is an alternative method to achieve more weight distribution capacity with a sawtooth hanger module for larger heavy painting panels, using a 3” x 6” plate with a different positioning of a sawtooth hanger (as shown in video).
Add a profile depth to complete the Float Hanging System

This spacer is a part of float hanging system that affixes to the back of panels (medium and large formats) and is not visible from the front view, meaning painting panels will have appearance of floating 1/4 inch from the wall.
-Cut two pieces of foam-board with two pieces of double sided tape (1” x 1”), then attach them together and place them on the lower back of panel to create 1/4” of space between the panel and the wall (as shown in picture below).

-The float hanging system is now complete.
Here are several factors that could lead to bowing of composite panels:
Cutting
Dibond cutting can be accomplished best by saw cutting or routing. Knife cutting fabrication method is not recommended for composite panels. As excessive tension which is created by the cutting process (folding the cutting joint) may lead to bowing of the substrate. If a cut is only made on one side of the panel, folding the cutting joint with back and forth motion will cause a slight “roll-down” of the aluminum cover sheet on the folding impact side. In this “roll-down” area, the polyethylene core is compressed and can lead to increased stress between the core and the aluminum cover sheets (the beam structure of panel).
This imbalanced tensile and compressive stress on composite components, cause the substrate to bow.
Therefore, if the panel must to be cut with a knife, it is imperative to cut on both sides of the panel, to minimize tension within the composite components.
Counter-Balancing
Care should be taken when apply coating only on one side with bonding primer and ground (gesso). As the coat layers cure out, tensile forces within the primer and ground may cause the substrate to bow, especially with larger panels and thinner gauge substrates (1mm to 3mm).
It may be necessary to apply a counter-coating of comparable strength on the back side. Other experimental solution is to not remove the manufacturer’s protection film from the back side, and consider it as a counter-balancing medium.
Other Considerations:
Thermal expansion should also be considered when preparing large format panels. Dibond material has a rate of expansion of .000156″/FT/°F. That translates into approximately a 1/8″ movement in an 8′ panel with a 100°F temperature change, which is more stable than conventional wooden painting panels and stretched linen or canvas expansion rate.
Therefore, temperature differences must be considered when using a frame for a Dibond painting. To avoid restricting thermal movement of the panel and eliminate unacceptable bowing or over stressing of the fasteners, consider an approximately 1/8″ space in between the edge of panel and inner side of frame.
The coefficient of expansion for unlike materials should be considered in float hanging design as well. And because of these physical facts, I present a float hanging system built from Dibond material.
Finally, Dibond material should always be stored in a cool dry area where temperatures are relatively stable. The best way to store this is to lay it flat. If the panel is leaned on its side, it should be positioned to lean on the horizontal edge of the panel only. Failure to do so may lead to bowing of composite panels and possibly result in permanent damage.
Some information in this article was extracted from the Dibond Fabrication Manual and some was based on personal experience working with composite mediums. Also see more related information and links at the end of this article.
The new concept of painting on composite mediums and all preparations associated with it, may seem complicated or not so convenient at first, as it was when painting on canvas or linen introduced to artists a long time ago. Ironically it is not a new concept that is inconvenient, but it’s our perception of the convenience/inconvenience that we may need to ponder. Only a creative mind can see inconvenience as opportunity for growth and adventure.
AG
Here is the list of tools and materials:

– DEWALT DWHT10045 25mm Single Blade Snap-Off Knife:https://goo.gl/idzhBd
-Cut Resistant Gloves:https://goo.gl/9pF7gb
-Safety Glasses:https://goo.gl/e9RdYX
-3M Sanding Sponge, Fine/Medium: https://goo.gl/eypFHd
-3M 150 Grit Pro Grade Sandpaper: https://goo.gl/UpFF9d
-Handle Hand Sander: https://goo.gl/X1gtV9
-DEWALT 1/4 Sheet Palm Grip Sander Kit: https://goo.gl/oKQw9R
-Quick-Jaw 6-Inch Mini Bar Clamp: https://goo.gl/srUfwz
-QUICK-GRIP Handi-Clamp, 4”: https://goo.gl/ztypQK
-43-Inch Straight Edge Safety Ruler: https://goo.gl/JMNNoK
– Aluminum Straight Edge Rule, 48″ Length, 2″ Width:
-1” x 48” Angle Aluminum: https://goo.gl/R73MyA
-Auto-Lock Tape Rule: https://goo.gl/YcnbCp
-8” Flat Files: https://goo.gl/y2HZUi
-Sharpie Markers
-Disposable Rags
-Dap Silicone RTV Rubber Auto/Marine Sealant, Clear: https://goo.gl/FMrMm1
Saw Tooth Hanger 3 Inches : https://goo.gl/PY9D17
-Liquitex Professional White Gesso Surface Prep Medium: https://goo.gl/pYVz3n
-Rust-Oleum Stops Rust Spray Paint, 12-Ounce, Flat Light Gray Auto Primer: https://goo.gl/DQUcdK
-Roller Frame for 6-Inch Rollers with 13-Inch Handle: https://goo.gl/P7htKp
-Plastic Paint Tray, For 6″ Rollers : https://goo.gl/BhySnt
– Clear 30 Minute Epoxy : https://goo.gl/jaKLwx
-Jigsaw : https://goo.gl/cNe47v
-Bosch Metal T-Shank Jig Saw Blades: https://goo.gl/7urJ1M
-Bottle sprayer
Links:
Dibond 4’x8’ Panels from Laird Plastics Company
More Apocalypse-Surviving Panels